Saturday, December 28, 2019

Vintage Fabric and Linen Half Aprons


One of my many obsessions is fabric, vintage linens, textiles, trim, and embellishments.  My house is bursting at the seams due to fabric overload.  I seem to gather more materials than I have projects for.

Well, this fall I decided to try and make a dent in the pile.  I used some old fabric - mostly cottons or cotton blends, vintage embroidered linens and bits and bobs of lace to make these Dottie Angel inspired aprons.   

They were fun to make and I can see a slight depression in my fabric stash - that is if you squint your eyes.  


Saturday, November 16, 2019

Christmas Compositions Cute Kitsch


I have to admit, I love Pinterest.  So many creative people and ideas.  Unfortunately, I spend way too much time on it and things that need to get done may or never get done.

I adore vintage Christmas items and found several good ideas on how to incorporate everyday items and Christmas items to give them new life.  A bit of nostalgia, a bit of retro, a bit of kitsch.


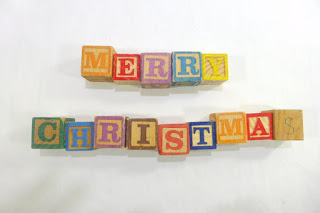
Here's a mix of vintage and not so vintage children's wood blocks that spell Merry Christmas.
Wouldn't it look great on a mantle?  Or use to decorate a window sill?

https://www.etsy.com/listing/665190875/merry-christmas-vintage-and-not-so?ref=shop_home_active_36


A flour sifter topped with a vintage flocked Santa Claus figure, a white plastic glittery reindeer, a vintage plastic poinsettia, and a not so vintage brush tree.

https://www.etsy.com/listing/650497680/vintage-christmas-diorama-flocked-santa?ref=shop_home_active_19


A vintage porcelain sugar bowl topped with a vintage flocked Santa and reindeer and a brush tree and vintage plastic poinsettia.  Sold.

Wednesday, December 14, 2016

Too Pretty To Toss - Repurpose Christmas Cards and Ribbon

Repurposed Christmas Cards and Ribbon
for Treat Bags


For about the last 5 years, I've made Christmas treat bags for the employees of my husband's small company.  They are filled with homemade cookies, breads and sweets.
 
I keep most of the Christmas cards that we receive and also pretty ribbon used on gifts from relatives and friends.
 
To put a dent in my hoard of cards and ribbons, I used #6 brown kraft paper bags and decorated them with the fronts of the Christmas cards and used the ribbon to tie them up.
 
Here's pictures of a finished bag, a bag waiting for treats and  the card waiting to be repurposed and the sentiments from the inside of the card.   You can use these as gift tags, or use make your own cards.  The fronts of cards can be repurposed into new cards or gift tags. 


Monday, February 29, 2016

Upholstery Fabric Swatch and Doily Zip Bag, Cosmetic Bag


I've been wanting to make one of these after seeing them on Pinterest.  No tutorials were found but it did not look too difficult.

I dove into my stash of upholstery samples and found a neutral plush/velvet like swatch.  Removed the casing at the top where it used to hang on a rod and removed the plastic label sewn on one corner on the back.  I had to rub the fabric with my finger to push back the fibers where the thread was sewn for casing to hide the needle holes.

The doily I chose was close in diameter to the zipper length - 9 inches. 

So, first I cut out the fabric pieces for the outside (velvet) fabric and also the lining fabric which was a cotton.  I did not use any type of batting since the velvet piece gave it a nice weight.  Then I cut the doily - not quite evenly but it really didn't matter that much.

Sewed the doily to each exterior piece of fabric. I used a free darning foot that I purchased on line but could not quite get the hang of using it, so I used my zipper foot on the doily.

Then  I proceeded to assemble the bag based on tutorials on the web for making a zip pouch.

The above is the result.  One thing I did learn is that it is better to sew the doily on to the fabric piece first and then cut out the pieces - way easier and probably more accurate when trying to line up edges.  The edges of the doily do not really line up but they are separated by the zipper so it's not too noticeable?

Well, not too bad for my first attempt.

Wednesday, February 3, 2016

Button Wreath Christmas Ornaments

Soo Many Buttons . .  . . .
 
So besides crochet doilies, I have an addiction to buttons and
knew that one of these days I would have to do something with them besides making button bracelets - I tend to favorite darker, metallic buttons to make the bracelets.  So what to do with the other buttons that are gathering dust in my black hole of craft supplies?  Wreath ornaments, of course!  There are dozens of tutorials to make these on Pinterest - each with a little different approach.  I decided to take the low budget approach - use what you have in the craft stash.
 
So to begin,  I used a cardboard from an old gift box - a bit thicker
and heavier than a shirt box, traced the outline from a vintage mold and cut the shape out using kitchen shears and sharp pointy shears for the interior circle.  Then I wrapped the shape with scraps of white bias tape for one, and blanket binding for the other - using a hot glue gun just at the beginning and ending of each fabric piece.  I used some gold cording - again scraps for  the hanger and ribbon. Don't forget to add the hanger before you start gluing the buttons on.
 
I used a variety of  buttons in shades of white and some clear in  different sizes to make the wreaths. I started with the exterior edges - alternating smaller and larger buttons and also at the interior opening.  I had to reposition some of the buttons to make them fit better.  Then I filled in the spaces in between the outer and inner circles.  And the adding another layer of buttons to hide any gaps. 
 
Added a simple bow at the top.  These will be samples for the Women of St. Joseph's craft group.  Hope they will like them and make more for their annual craft show in November.
They donate all the proceeds to charity. 
 
I am going to do a heart shaped design next and will post it if it turns out as pretty as these. 


Button Wreath Ornaments


Back of wreath - cardboard wrapped with satin blanket binding
that was torn into strips

Cardboard circles cut from heavy gift box

Vintage dessert mold used as template for wreath
 

Monday, January 4, 2016

Crochet Doilies - Re-loved, Repurposed


Crochet Doilies - Re-loved, Repurposed
 
    I used to have quite an aversion for these doilies.  When I was young, we had a plethora of these that covered every furniture surface in our house.  And, I was responsible for dusting, so you can imagine what a chore it was to remove these and anything on top of it, dust, and then return everything to their original positions.  Yuck!
 
   Fast forward several decades, and now I have an obsession with these.  Back then I did not appreciate the patience and skill it took to make these.  Now I wonder about the women that made these, and I think about my mom.  It was her way of adding some decoration to our modest home without spending a lot of money. 
 
As my collection of these doilies threatened to overtake not one but two dressers, I decided it was time to create something with them.  Hence the above bags.
 
   After looking at Pinterest, Etsy and Ebay and finding beautiful bags, I got inspired to make a few just to see if I could.  Voila!
 
   I used a store bought pattern from Joann's, upholstery samples from my fabric stash, buttons from my button stash, scraps of lace to create one of a kind bags.
 
   Not hard to do but a bit tedious as I had to hand stitch some of the pieces in place to anchor them.  Also, I'm a bit of a stickler for colors, textures, etc.   Assembling the right combinations that satisfied me took the longest time.
 
No tutorial but perhaps some inspiration to jump in and do it in 2016.  No fear.  If I can do it, anyone can do it. 


Wednesday, August 27, 2014

Fabric Pumpkins from Child's T-Shirt


These turned out great.  I looked at several videos on You Tube and they are made very similar.
I bought a child's long sleeve waffle knit T-shirt at Goodwill for $1.99.  Washed it first and then cut the sleeves and body up.  Sleeves were cut about 2 to 3 inches high.  The first one turned out to the the littlest one in pic.   From the body, I cut out about a 6 inch high piece and seamed the sides to make a tube.  Running stitches on top and bottom, stuffed them to make puffs and then made segments by threading through center and pulling tight.  You can get more details on You Tube. 

I wrapped for floral wire with green foral tape and made the vines, got twigs from the yard for the stems and some silk leaves, hot glued them on the top, a leaf on the bottom to hide the stitching and
we had a pumpkin patch. 

Going to make some with cotton fabric and a different color - stay tuned.

Friday, June 14, 2013

Vintage Pillowcase and Crochet Apron


Vintage Pillowcase and Crochet Apron

One day I picked up a copy of Apronology published by Somerset Publications and I was hooked.  I was so impressed by the incredible talent and imagination displayed between its' pages.  So many pretty aprons, so many different takes on a common  place piece of apparel.

I decided I needed to jump in.  I sew and make aprons and have repurposed men's dress shirts into aprons but not a pillowcase and a piece of vintage handmade crochet.

This apron was made by opening up the pillowcase at it's seam.  The finished hem is the hem of the apron.  The pillowcase was about 28" in length so I cut the apron skirt at 20 inches which left me with 8 inches to make the ties and the waistband.  The waistband and ties are 4 inches wide. 

The raw edges on the sides of the apron were folded over pressed then folded over again and stitched to conceal the raw edges.  At the top of the apron, I sewed a gathering stitch and gently pulled it so the finished width was about 20".  Then I cut one of the remaining 4 inch wide pieces to the width of the skirt for the waistband.  I added the vintage crochet piece over the skirt, pinned the waistband piece to the skirt and stitched them all together.  I cut the other 4" wide piece of fabric into two equal lengths and also the remaining piece from the waistband, joined them to make the apron ties. 
These were folded right sides together, stitched on one short side and open side, turned right side out and pressed.  Then the waistband part was folded over, the two ties pinned into the waistband with raw edges pressed and turned in and then sewn together. 

Those of you who know how to sew probably get my explanation.  Should have taken pics during construction but I'm not very good at it and didn't think I was going to use it for the blog.

If you have questions, let me know.

I thought it turned out pretty nice, planning my next combo of vintage pieces for another apron.


Monday, June 10, 2013

Gift Tags from Photo Dividers


I am always in the need of organization . . . craftaholics at least the ones that I know tend to have excesses of supplies and finished projects.  My jewelry inventory was growing due to the upcoming show season and I needed storage for my pieces.   But I'm the type of person that looks for items that will do double duty.
 
Michael's had a sale and cardboard storage boxes where on sale - 5 for $10.00.  I thought they would be perfect for storing my pieces in, affordable and they would be great for adding height in our displays at the shows.  I bought several in black and tan for storage and the neutral colors would be perfect for the booth. 
 
Each box comes with a set of  cardstock weight dividers which I didn't need but rather than toss them - I decided to make gift tags with them.  I used my Cuttlebug, a die from Sizzix (?) and red satin ribbon.   Perfect!  Even has dotted lines to write a little note on. 
 
 The remains of the dividers will go in the recycle bin.


Thursday, May 23, 2013

Repurposed Vintage Earrings and Button Bracelet


Vintage Earrings and Button Bracelet
 
 
I love vintage earrings and buttons.  I'm a hoarder of these.   This bracelet is really easy to make.
 
Purchased the bracelet blank from Fire Mountain (is it one word or two?) and used E6000 glue to attached earrings and buttons to bracelet blank.  The bracelet blank is links with flat disks between links so glue the baubles to the flat piece.  Remove any shanks, clips, etc. for the earring and button backs.  Sometimes the earrings are wired to another flat piece and you may wish to remove this piece also.  But be careful - it may destabilize the earring itself.
 
Arrange your pieces in a composition that pleases you and then glue.  It may require that you glue one - let each piece dry before you add the next one.  And there you go.  Be sure to do this in a well ventilated room as the fumes are a bit strong from the glue.


Tuesday, May 21, 2013

Bullet Casing Earrings - A Birthday Gift for A Friend

 
38 Bullet Casing Earrings
 
 
Ever since I saw bullet casings used to make jewelry, I've wanted to make some.  But, the problem was not getting the casings but drilling them.  I tried using my handy dandy Dremol tool but the bit was too small and the casing got hot.
 
Desperate to make earrings for a girlfriend's birthday gift, I implored my husband to help me.  And, he came through.  Not only did he do these two but several more so that I have them ready for my next project.  He used his regular heavy duty hand drill and a metal drill bit - 3/32nd.  The casings were wrapped in a piece of cloth and he held it steady with a pair of pliers to drill.
 
I used 18 gauge silverplated wire formed duplicate links and hammered them on my anvil with a regular claw hammer.  I wire wrapped several faceted glass beads and hung them on the hammered links and then wirewrapped the tops with another piece of wire this time 22 gauge, threaded it through the hole in the casing and added more faceted glass beads, wire wrapped a loop, hammered it then attached the sterling silver ear wires.  Ta dah! Birthday gift complete. 
  
Skip To My Lou

Friday, May 17, 2013

Bold Button Bracelet - What To Do With Buttons


Button Bracelets
 
 
You probably have seen these all over the internet and at craft shows.  Button bracelets are a fun way to repurpose vintage and not so vintage buttons.  It's not hard really,  just takes time - a few hours.
 
 
I used a wide elastic band for the base.  I took a piece of 1 inch wide elastic and wrapped it around my wrist - loosely.  Allow for some give so that it will fit different wrist sizes.  Then I cut the elastic and sewed the two ends together securely with my sewing machine.  Since the elastic will get stretched when the bracelet is put on and taken off make sure that the ends are secure.
 
 
I used a dark brown elastic to coordinate with the buttons that I chose to use.   You want the elastic to blend in  with the buttons in case there are gaps.
 
 
I preselected some buttons that I knew I wanted to use as focal points.  Then I picked through my button stash and found smaller buttons to be fillers.   I used coordinating thread also so that it doesn't stand out against the brown elastic.  There's lots of stitches and you don't want to see them on the backside of the bracelet. 
 
 
I start sewing buttons on the elastic band  - the smaller ones first - usually at the edge of the band.  I like to have them extend beyond the edges of the band. 
 
 
Keep sewing them on and try the bracelet on every so often.  You will notice where there are gaps, etc.  Just fill them in with a button.  Stack flat buttons  and sew together or use a flat button and one with a short shank sewed together.  The fun part is you never know what your bracelet will turn out like but guarantee, it will be gorgeous!

Monday, May 13, 2013

Upcycled Leather Cuff Bracelet with Conchos


Leather Cuff Bracelet with Conchos
 
 
I've played with old belts and used them for purse handles before.   Found 3 different belts, one was a mens' worn out belt and two were ladies belts with metal conchos.  One was black faux leather and the other was turquoise faux snakeskin. 
 
 
I cut the mens' belt to a length that fit my wrist, strung the conchos on a piece of scrap leather and layered it over the belt.  Then I punched holes in both pieces to add the clasp.  Wire-wrapped the claps to the ends of both pieces and clasp.